Pesto chicken lasagne

Who doesn’t love pesto? It’s basically a rite of passage to live off of a pre-made pesto pasta for at least half of your time at university nowadays, but it’s actually very simple to make yourself.

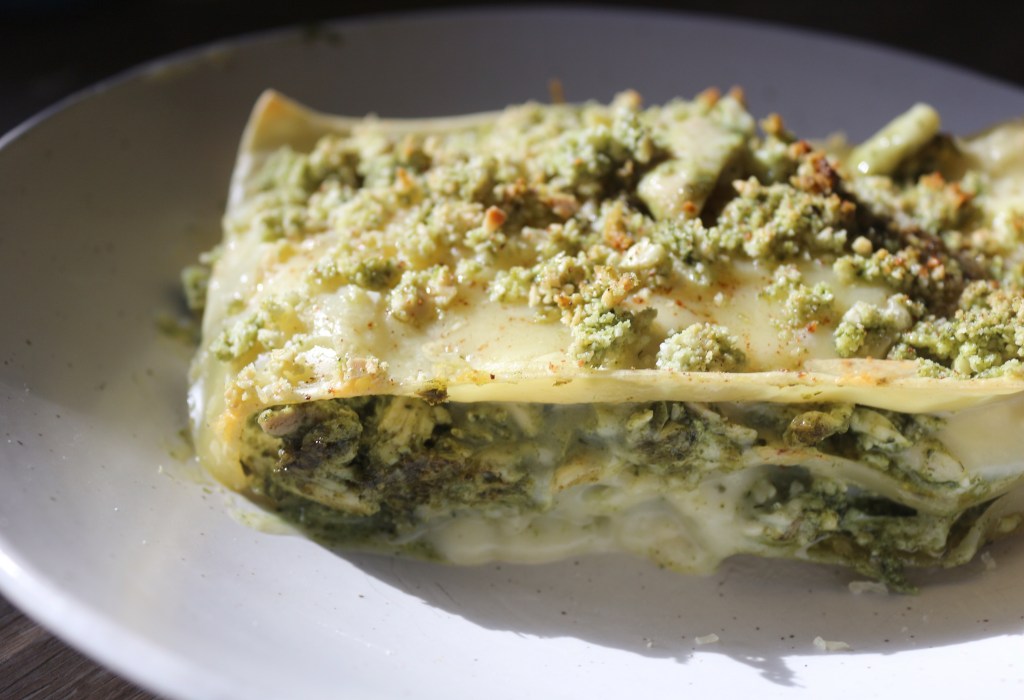
This recipe takes the greatest of the pasta sauces – both pesto and béchamel and combines them in a super creamy chicken lasagne dish, where you won’t need to spend ages simmering a ragù sauce and ensuring the meat is cooked adequately, as leftover chicken works a trick here.

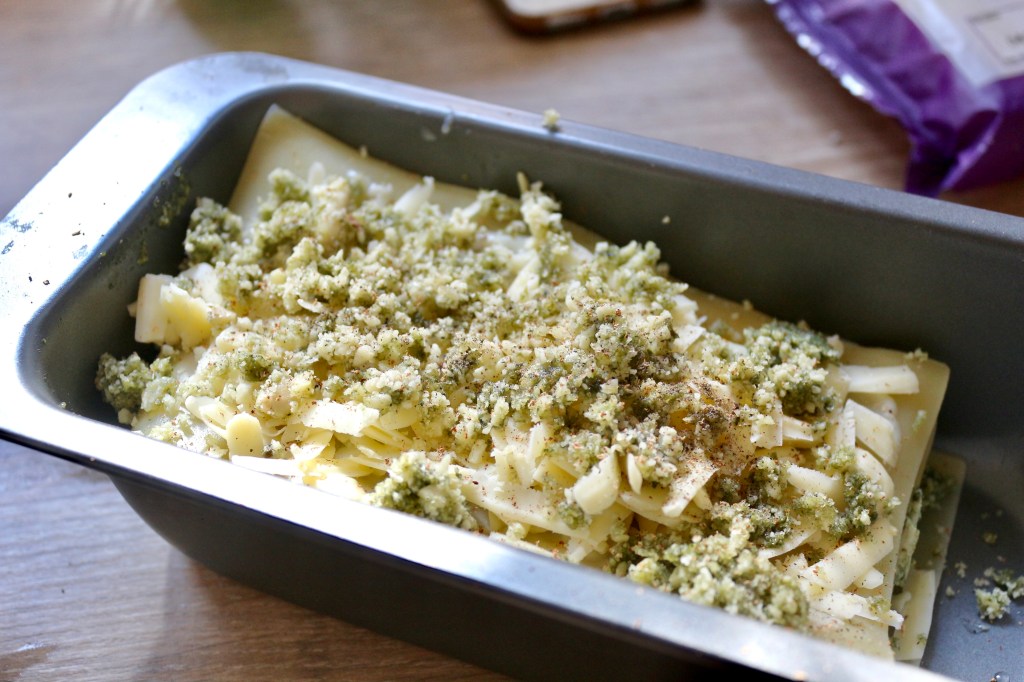
With the crunch of almonds on top, combined with oozy melted cheddar, this is a super comforting dish that looks even more impressive than a standard lasagne.

Serves 2

Ingredients:

For the pesto

30g basil

30g pine nuts

2tbsp olive oil

1 clove garlic

1tbsp grated parmesan

For the lasagne

125g shredded cooked chicken

50g cheddar

4 lasagne sheets

2tbsp butter

1 clove garlic

3tbsp flour

milk

nutmeg

handful of almonds

  1. Preheat the oven to 180 degrees (depending on your oven – use your own judgement).
  2. Put all the pesto ingredients into a food processor and blend to a paste.
  3. Boil some salted water and part-cook the lasagne sheets until very al dente.
  4. To make the white sauce, melt the butter in a saucepan, add the diced garlic and flour and mix well.
  5. Add milk bit by bit, continuing to stir on a low-med heat until you have a thickened sauce.
  6. Grate in the nutmeg and remove from the heat.
  7. Mix the chicken and pesto in a bowl.
  8. In a food processor, blitz the almonds into coarse crumbs. For extra flavour, don’t wash out the processor after making the pesto, as then your almond crumbs will suck up all the excess pesto left in there.
  9. In a loaf tin, layer a lasagna sheet, then chicken and white sauce, then repeat twice more.
  10. Top with the final sheet and sprinkle with grated cheese and the almond crumb.
  11. Bake for 15 minutes until the cheese on top is golden.

¡Comemos!

xo

French Toast 2 Ways: Sweet and Savoury

Cooking for one can require a lot of planning sometimes, but luckily for me, I am the food planning queen. My intensive organisation essentially means I avoid wasting food, whilst also avoiding cooking the same boring meals over and over. If I plan, I can decide how to use the same ingredients to create different dishes, and that’s where my French Toast comes in.

One whole loaf of Brioche is quite a lot for one person to get through before it gets past its best, but I certainly managed it. Here are two ways to use that loaf in a short space of time in completely different meals. Both ideal for a delicious brunch, my sweet French toast stack, and savoury gooey eggy bread are indulgent, comforting and restaurant-brunch-worthy.

They’re incredibly easy to follow, so be sure to give them a go!

SWEET

Rocky Road Brioche French Toast Sandwich Stack

Serves 2

Ingredients:

6 slices of Brioche

Nutella

6 digestive biscuits

2 handfuls marshmallows (mini or larger ones torn into smaller pieces)

2 eggs, beaten

2 tbsp honey

2tsp vanilla essence

icing sugar

butter

  1. Whisk together 1 egg, 1 tbsp honey and 1tsp vanilla essence.Soak both sides of 2 Brioche slices – you don’t need to leave them for very long at all, as the egg mixture will very quickly saturate the Brioche and you don’t want it to end up falling apart!
  2. Heat the butter in a non-stick pan and fry the 2 soaked slices until golden on both sides. These will form the middle slices of each stack.
  3. Soak just one side of 4 more slices – 2 slices will form the tops of the sandwiches and 2 will form the bottom layers. At this point I needed to make a 2nd bowl of egg wash mix, hence the need for 2 eggs above so you may need to do the same.
  4. Now stack your sandwiches. The bottom slice should have egg wash only on the bottom side, and be dry on top. To this slice, add a layer of Nutella, a generous sprinkling of Marshmallows and crumble some chunky-ish pieces of biscuit over the top.
  5. Now add the middle slice of Brioche – remember, this is the one that we cooked at the beginning with both sides sealed in egg wash. Repeat the layering of Nutella, marshmallows and crumbled biscuit, and finish with the top slice (egg wash side facing upwards).
  6. Heat some more butter and add your 3 layer sandwich stack. Weigh it down by placing a small plate on top, followed by a heavy tin, as this will encourage everything in the sandwich to melt and bind it all together.
  7. After a couple of minutes on a low-medium heat, check that the bottom is golden brown, then turn over and do the same with the other side.
  8. Remove the sandwich to a plate (can cover with foil to keep warm), and repeat with your second sandwich.
  9. When both sandwich stacks are complete, sprinkle over the remaining marshmallows and biscuit crumb and drizzle over as much heated, loosened Nutella as you wish.
  10. Finish with a sieved sprinkling of icing sugar and dig in!

As always, I love a good plantification of dishes. For those unsure, that translates as a vegan alternative. As farfetched as it may seem, this is definitely not out of bounds for those following a plant-based diet. Nowadays you can buy vegan Brioche, get vegan Nutella equivalents, vegan butter-based biscuits and vegan marshmallows. The egg isn’t even an essential! For your wash, simply mix some plant-based milk with a little vanilla essence and maple syrup and it still work really well!

SAVOURY

Caprese Eggy Bread

Serves 2

Ingredients:

4 slices of Brioche

1 ball of mozzarella

handful of basil

6-8 cherry tomatoes (depending on how much you like them!)

salt/pepper

1-2 eggs, beaten

pesto – homemade or from a jar

butter

  1. Preheat the oven to 180C, and when ready, roast the tomatoes in a little oil, salt and pepper until they’re just bursting from their skins.
  2. Spread a layer of pesto on top of 2 of the Brioche slices.
  3. Tear the mozzarella and place that on top.
  4. Sprinkle over some pepper, followed by some basil leaves and the tomatoes. Add a little more salt and pepper and then top with the other slice.
  5. Soak the top and bottom sides of each sandwich in the beaten egg and then cook in melted butter in a non-stick pan on medium heat until golden brown. Like with the sweet version, place a small plate over the sandwich, topped with a heavy tin to weigh it down and encourage the mozzarella to melt and the sandwich to bind.
  6. Repeat on the other side and then slice into 2 large triangles to serve.

You may notice in the image above that I used larger salad tomatoes instead of roasted cherry tomatoes. Well, those tomatoes were rubbish and I don’t recommend trying that version – annoyingly, it’s the only photo I have!

Feel free to alter the proportions when it comes to the quantities of mozzarella, tomatoes, basil and basil you use. Make it your own, just how you like it. My original version of this recipe didn’t feature pesto, so you could try it without and the gooey mozzarella with sweet roasted tomatoes should do the trick equally as well – you could always add a drizzle of balsamic too, but I just adore pesto, and combined it creates a delicious pool of Italian flavours.

This has been one of my most exciting recipe posts to write, because having tasty, creative French toast dishes at home feels like such a luxury that’s normally reserved for quirky cafes and restaurants. But now it’s super simple for you to try yourself. Awful day at work? Why not go wild and even try it for dinner one day? When it comes to my meals, there are no rules.

¡Comemos!

xo

Butternut Squash, Blue Cheese and Pear Puff Pastry Tart

I love puff pastry. The pre-prepared kind, that is. I’ve never attempted to make it myself, and maybe one day I’ll give it a go, but for now, ready-rolled is an absolute lifesaver.

I love the crunch as you bite into it, with little flakes floating down everywhere. It has a lightness that shortcrust lacks, and a delicious butteriness that you don’t get from filo.

Because you don’t need to make the pastry, this tart is so simple to make, and can be served as one large tart, or smaller, individual versions, using exactly the same measurements.

I used the amazing Beauvale blue cheese from Cropwell Bishop Creamery, which is local to me, as it’s incredibly creamy which is ideal for creating the dreamy melted blue cheese topping, rather than an equally as delicious, but not so practical crumbly Stilton.

From the photos, you’ll notice that there are two versions of this tart that I made. The first used all the ingredients, but I wasn’t happy with the base, so decided to remake it, and the second version was spot on. Having said that, I didn’t have enough puff pastry or any pears the second time, hence the smaller tarts and fewer toppings.

You can absolutely get the tart to cook through completely without the bottom being soggy, but don’t be afraid to let the outside edges brown a little more to do so. Baking the pastry blind beforehand will also help to ensure it’s completely cooked through.

I won’t even lie, the first time I made this, I ate the entire tart in one go. I just kept going back for more it was so good, so now, over to you…

Makes 1 large rectangular tart and 4 individual tarts

Ingredients:

½ packet of ready rolled puff pastry

½ butternut squash

salt/pepper

rosemary

1tbsp cornflour

1btsp honey + 1btsp balsamic vinegar (combined)

1 pear

75-100g blue cheese (the creamier the better)

1 egg, beaten

chopped walnuts (optional)

  1. Preheat oven to 180.
  2. Cut squash into thin discs and add to a baking tray with olive oil, salt, pepper and rosemary, and roast until soft. This shouldn’t take long – around 10 mins, depending on your oven.
  3. Unroll the pastry and fold over the edges to create a crust. Bake the puff pastry until puffed up and starting to brown slightly (5-8 mins).
  4. Remove pastry from the oven and flatten out the puffed up centre.
  5. Sprinkle the cornflour over the pastry base so that any excess moisture from the filling will be soaked up.
  6. Layer over the squash, pear and chunks of blue cheese, then brush the edges with egg wash before placing back in the oven to bake until golden and cooked throughout. You will need to monitor the base as this will cook slower than the edges which will brown quickly, so turn the heat down if need be.
  7. After removing from the oven, ensure base is not soggy, top with the chopped walnuts and drizzle with the honey/balsamic vinegar dressing.

I topped the finished tart with my favourite spice mix, which is a Spanish brand, including garlic, onion, thyme, chilli flakes and some other spices in there, but you can top with whatever you enjoy – whether that’s a sprinkle of chilli flakes, a few sprigs of rosemary, a dusting of pepper, or just leave it as is!

Once you’ve baked your first tart, you’ll realise how easy it is to customise and make it your own. There are so many different toppings you could experiment with, from Italian caprese, to goat’s cheese and honey, or a classic cranberry and Brie. So get experimenting, and…

¡Comemos!

xo